
Are you spending valuable time creating blog graphics?
Taking time to write a blog post is one thing. Creating sharable images for others to pin, tweet, and like is something different. Nothing can jack up your schedule more than trying to make just the right blog graphics.
It can be a real time suck.
I am a huge supporter of anything that makes blogging faster and easier. I like to systemize as much of my blogging process as possible. One of the ways I shave time off getting a post published is by having templates I can use for all of my blog graphics.
Once I identified my blog niche and my audience, it became crystal clear just how many blog post topics were waiting to be covered. I knew I had my work cut out for me. The writing was overwhelming enough, but add to it making graphics for every post and sharing them all around social media: I was out for the count. Oy vey!
See, the thing is, I am also a wife and a mom. I don’t have the luxury of sitting around all day feeding my blogging habit. There are clothes to wash, meals to prepare, kids to educate, and a husband who enjoys seeing me every once in a while. Can you relate?

I use affiliate links. At no additional cost to you, when you make a purchase I may get a small commission. Your support is very appreciated. Thank you!
Early on, I started looking for ways to cut down my time behind the computer. One of the ways I shaved off time was to create templates for my blog graphics. With the use of PicMonkey and a few free graphics sites, I can now write a post and get it ready for publishing in way less time than it’s ever taken me before.
You can adopt this system easily for your own blog. Once you do, you’ll be on your way to producing more posts and still having more free time. What’s not to love about that?
Systemizing your graphics takes the headache out of working on a blog post. You’ll know you can complete the task quickly and easily because you’ve set up a system ahead of time.
This is my suggested process. You can copy it exactly or you can customize it for your unique blog use.
{Updated for 2020}
Create Templates In PicMonkey
Create several sizes for all of you blog posts plus an original you can find easily if needed. You can decide which sizes are best for you based on your template and other factors. Here are the sized I currently use:
- Main (sizes vary) – This is the main photo you will use for the post. It will be the photo you want shared across social media. Save it for any future use. This file should be large so it looks good on all the other sizes below. But make sure it’s not too large as to take up valuable space on your hard drive. I recommend around 1MB max.
- Facebook (900×900) – Facebook prefers certain sizes of graphics. The square is also an ideal size for Instagram.
- Pin (600x 1025) – This is your most important graphic, the one that will be shared on Pinterest, which for me is my biggest traffic driver to my blog.
- Twitter (1280×720) – Can also be used on Facebook and LinkedIn.
- Featured (850×390) – This will depend on your template but a good featured image is key.
- Blog (730×430) – This is for internal post pictures. Use the best size for your template.
HOW TO MAKE A TEMPLATE:
- Go to PicMonkey.
- Create a plain graphic from the design section.
- Choose the custom size option.
- Save as a white graphic.
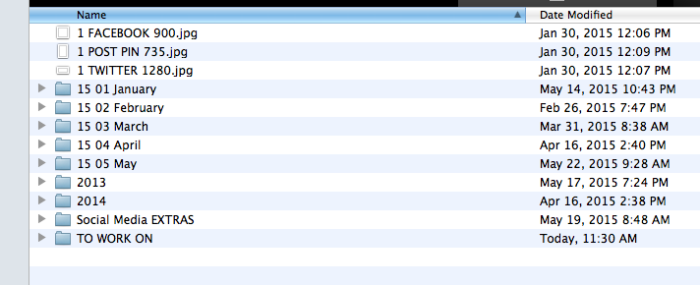
- Name it one of the following (Using a number 1 keeps those files at the top of your list – see example below)
- 1 FACEBOOK
- 1 PIN
- 1 TWITTER
- 1 FEATURED
- 1 BLOG
- Save to your graphics or social media folder.
Organize your posts by date
Each time you use a photo for your blog save it in a dated folder. This will help you to stay organized. Here’s what one of my folders looks like so I can find the graphics for an old post easily and quickly.
The more organized you are with your graphics, the more time you will save when it come to making new graphics for your posts.
Save your photos using keywords
After you make a graphic for your blog post, be sure to save it using the keywords you are going to use for the post. Don’t even bother using anything else. This will help with organization and with SEO. It will also help with Pinterest if you are using titles for your descriptions.
Here is what the inside of one of the above folders looks like. You can see how I organize everything using keywords.
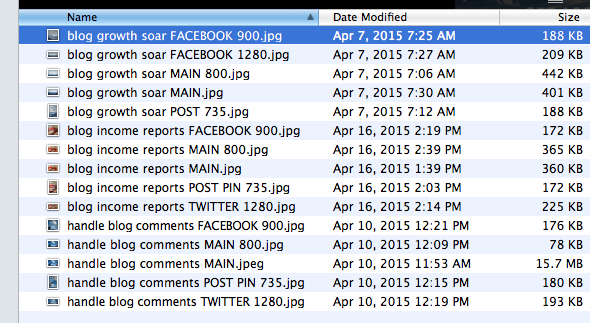
When you use an organized saving method for your blog graphics you can find them more quickly when you need to update the post, you can easily see which photos or graphics you have already used, and you can simply find your original if you want to promote your post at a later date.
When you save your photos with the right keywords, it will also save you time if you somehow forget to put them in the alt text area of your graphic. But you’d never do that, right?
I write posts about blogging. I don’t use very many graphics in my posts. You might write about something different where you are using many more photos. You can adapt this system easily to fit your own needs.
Figure out what size graphics you use and create a template for each one. This may include vertical, horizontal, and collage templates. It’s up to you.
Publishing a new blog post is always exciting. Use these tips to keep your blog organized, your time commitment to a minimum, and your audience coming back for more.
Do you use any of these methods to speed up the blogging process?

Photo by Kaylah Otto on Unsplash
Photo by Markus Spiske on Unsplash

Leave a Reply