How To Protect Your Blog The Easy Way
Working with clients has given me great insight into how well bloggers are protecting their sites. Or not.
Some days it blows my mind how vulnerable people’s blogs can be. I don’t want you to fall prey to a hacker and lose all your content. I want you to protect your blog and keep it safe.
You’ve put your blood, sweat, and tears into your site. With all of that investment into the design and content it probably feels like one of your children. I know mine does. How horrible would it be if someone on the other side of the globe was able to get into you dashboard and kidnap your site?
Oh, perish the thought. I can’t even think about it.
But if you are using lax methods to get into your site it won’t take much for someone else to take it all away. So, what can you do?
There is an easy way to protect your site and you can do it in about five minutes.
{UPDATED for 2020}
Add a new login name to protect your blog
Hopefully, you do not login to your blog using ADMIN as your username. If you do I am giving you the eye roll right now.
But maybe you use your name or the name of your blog or even your email address. It’s time to change it.
Now, I fully understand that you may have had your site built by a designer and you didn’t get to choose your username. That’s okay but now you need to take control of your site.
Note: This post is geared towards WordPress users.
Here we go:
- Log into your blog
- Go to the Dashboard
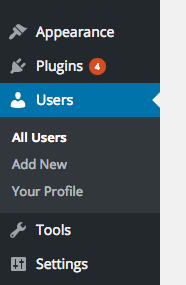
- In the left side menu bar click USERS – ADD NEW
4. Fill in the new user form
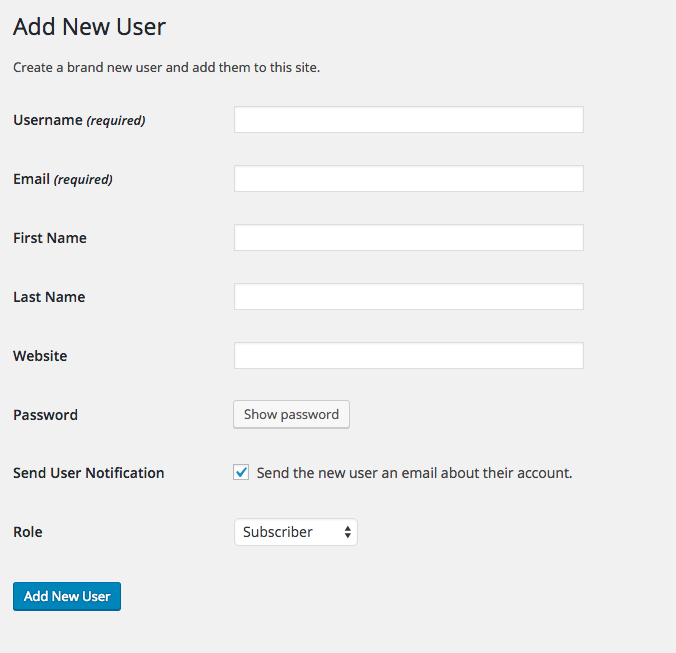
USERNAME:
This is very important. You need to choose a difficult username for signing into your blog. If I were going to use my name I would type something like this:
D3Bi5tAn9e1And (but I don’t so don’t try to use this one to hack my site!)
A username can be letters and numbers but not symbols.
Hackers who look for accounts to kidnap use bots. The bots aren’t geniuses. They usually try usernames like admin, the name of your blog with hyphens, or your first and last name. Making your username varied with letters, capitals and small, and numbers will help throw the bots off.
FIRST NAME:
Add your real first name – or the name you want your blog to use for authorship.
LAST NAME:
Use your last name or initial. Or not.
WEBSITE:
This is optional since you are the owner of the blog.
EMAIL:
You must use an email address that is different from the one you signed up with originally. To check which email you used click ALL USERS on the left side menu and EDIT your current profile. The email address will be in the CONTACT INFO section.
Use any email you have. If you want to use a specific email that is already taken you will be able to change to it later in the process.
PASSWORD:
For the password, click the SHOW PASSWORD box. You can either choose the password they choose for you or your own. Make sure it is filled with letters, numbers, and symbols and that you keep a copy of it in your records. Variation is key here.

5. Choose a role
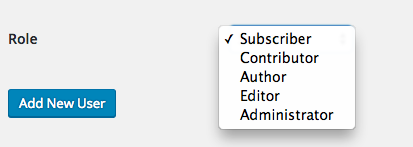
Because this is going to be yourself choose ADMINISTRATOR
6. Click ADD NEW USER – now you will have the new user you created and your old login user

Now, you need to attribute your new username to yourself.
Click on your new username. This will take you to the EDIT USER screen.
Scroll down to DISPLAY NAME PUBLICLY AS and choose your name the way you want it to appear in your byline and in the upper right corner of your login screen.
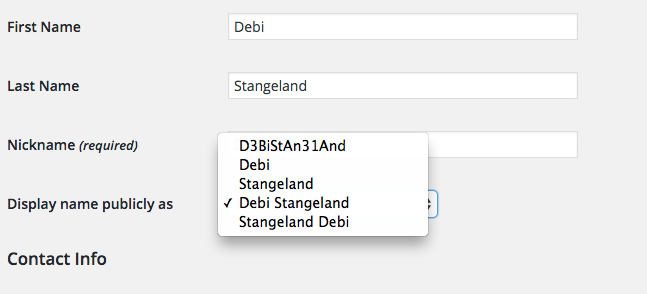
UPDATE USER at the bottom of the screen.
Disable your old login info to protect your blog
Now it’s time to disable your old login info.
But, before you do, log out of your WP account and log back in with your new username and password to make sure they are working properly. If you get back in without any trouble you can move to the next step. If you have issues I would keep your old username as is until you feel confident about using the new one.
So, let’s say you are confident about your new username. It’s time to change your old username’s role. This will be temporary, until you know your new username works well.
A. Log in to WP with your new username
B. Go to USERS – ALL USERS in the left sidebar menu
C. Click the box next to your old username
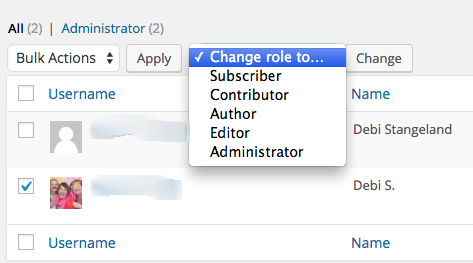
D. At the top of the screen click the CHANGE ROLE TO box and in the drop down menu change this user’s role to CONTRIBUTOR and then click CHANGE.
E. For the next five to seven days login using your new username. This old username will just sit, dormant.
Delete your old username to protect your blog
If you’ve used your new login name without incident for the past five to seven days you are ready to delete your old username.
- Login with your new username
- Go to USERS – ALL USERS
- Check the box next to your old username
- Change the BULK ACTIONS drop down to DELETE and hit APPLY
- Now you’ll be taken to a new screen to delete this user
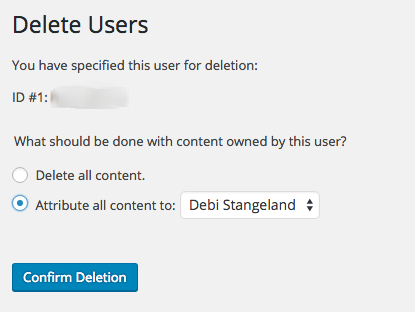
Be sure to click the bubble to attribute all content to yourself. This box will have the display publicly as name you chose in a previous step.
6. Confirm the deletion.
Now you can go back in to your new username and change the email address to your address of choice.
That’s it. Your old username is gone and your new username is being used exclusively for your blog. Your blog is now much safer than it was before and you can rest easier knowing you are much more protected from bots and hackers.
You are on the path to success. Keep moving forward.
Do you need to change your login credentials to avoid hacking?





I’m excited to get this done, Debi. I always appreciate your great tips.
Marva | sunSPARKLEshine
Thanks Marva. You go girl!!
Just wanted to give a real-world example of what happens when you neglect to click the “attribute” option. I used a specific username to design a new blog and I wanted to delete it because it kept getting tied to a gravatar. I did NOT click the attribute and immediately lost the blog page and two others, not to mention a lot of images! Please make sure to follow Debi’s directions above. Had I not been quick to read her post, I would not have made this horrible mistake. Fortunately, I was able to recover the pages and reload the images, but I suffered very high blood pressure for a time! Thank you, Debi, for all you share here!
Thanks for sharing this “real-life” experience Carrie. I can’t imagine what you were feeling when they disappeared. YIKES! I’m glad you got it all worked out. Thanks for taking the time to share.
Thank you, Debi, for your thorough instructions. I have just completed 5 days of use under the new username and needed to find your instructions again before tackling the last step. I’m very glad I did. I just read the comment from another reader who missed a step. That would have given me heart palpitations for sure! Anyway, thank you for your thorough instructions. I feel much better having a new username and much stronger password.
You are so welcome. I’m glad this was helpful for you. AND you followed all the steps. I’m glad your site is more secure now too! Thanks for reading.