How To Choose The Best Blog Post Visibility Option
If you’ve been blogging for more than a week you probably have a whole slew of old posts sitting in your post library.
That could mean hundreds if you are like me. Some of my posts are still applicable to my audience (aka evergreen). Some of them don’t fit my niche anymore. Some are filled with great information but need to be reworked or updated. Some need to just die.
At regular intervals it’s important to clean up your blog. However, you might be wondering what to do with all of your old posts. How do you set them aside without actually deleting them?
I won’t pretend cleaning up a blog is easy. You’ve poured blood, sweat, and tears into your posts and each one has at least some information you might be able to share as evergreen content or rework into another helpful offering to your readers. It’s kind of overwhelming.
But there is hope. Choosing the right blog post visibility option will make the clean up job much easier. It is also the first step in doing a major clean up on your blog.
One option is to turn all of your old, unwanted posts all back into drafts. This works, but it’s not the best post visibility option. I suggest taking a bit of a different route.
{Updated for 2020}
Ask The Right Questions
As you begin, there are some things to think about as you go to clean up your blog.
First, which posts do you want readers to have access to based on your niche?
Second, which posts are evergreen and need to be available all the time, regardless of niche?
Third, which posts do you want to rework to fit better into your niche?
Fourth, which posts need to be taken out of the mix because they no longer fit in your niche?
You can see I believe in having a niche. If you are struggling to find yours, keep working at it. It’s an important foundational piece of your blog success.
When you are ready to move beyond writing and sharing about every topic that catches your fancy and you want to start building a loyal audience, having a clean posting list is vital. If you want to maximize your reach you must provide your readers with consistent content that fits into your sphere of expertise and each post must be well produced with all the elements that will help grow your blog.
This means good titles, pinnable graphics, clear calls to action, and more. Cleaning up your blog is a chore, but you can do it right by starting with organizing your posts.
Assign Your Posts To The Right Designation
When you open up your WordPress dashboard and click the POSTS options, your screen will look something like this:
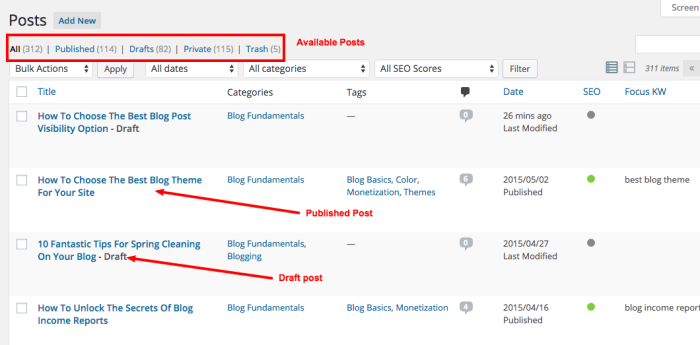
As you can see from this list there are published posts, draft posts, and at the top, categories for the different blog post visibility options available on WordPress.
These include: All, Published, Drafts, Private, and Trash.
All and Published should be pretty self explanatory.
In Drafts you should have only posts you are working on. This could mean you are in the process of writing them, reworking them, cleaning them up, or using them for a larger project such as an ebook.
Next, are all the posts you’ve set to Private. Private posts are those which no longer fit in your niche or are outdated and you don’t plan to re-release them at this time but they still contain valuable content you may use in the future or refer to at a later time.
But wait, you say, “I don’t have any private posts.” That may be true and it’s time to start using this category as you choose the best blog post visibility options for your written shares.
You now have two jobs. First, decide where each post should go based on the questions you asked above. Second, start placing your posts into the correct holding tank.
Going through each post individually can be overwhelming. I suggest using the filter feature at the top of the posts section to decide on your posts by category. Remember, you should have 5-8 categories max. If you have more than this you need to go back and rework your categories before you start this process.
Go through each category and decide which posts stay, which ones go, and which ones need to be changed. When this is done you can change multiple posts at once.
First, click the box next to the post title for all the posts you want to group together. Next, click the BULK ACTIONS button at the top of the list. Choose the EDIT option and click APPLY.
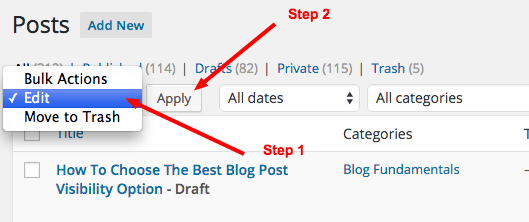
A pop-out box will appear with all of the posts you have chosen. Go to the STATUS option and click the dropdown. Now choose how you want to classify these posts.

Finally, update your selection.
The option for Pending Review would apply if you have a contributor site or guest posts. Otherwise, the main choices you’ll use are Published, Private, or Draft.
For the record, it is also possible to do this on each individual post, but it is also much more time consuming. In an individual post this option is on the sidebar of your editing screen.
Find the PUBLISH tab and look for the Visibility options.
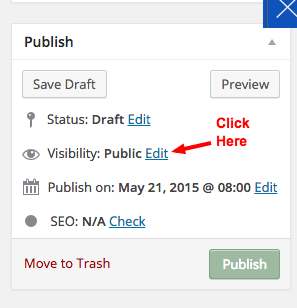
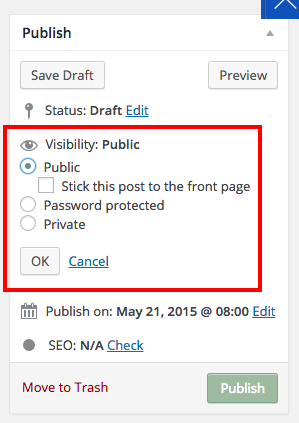
Choose an option and click OK.
Now see? That wasn’t too hard was it?
Figuring out which visibility option is right for each post is crucial as you move into the process of cleaning up your blog. The more organized you can be in this area, the easier it will be to work on tidying up what’s important.
Taking time to complete this step will help you as you move into the larger process of cleaning-up and re-sharing your most popular and important posts again.
Are you ready to start cleaning up your blog?




Doesn’t setting them to private result in broken links if anyone has linked to you?
Yes, it would not show up for anyone and would be a broken link. Private is meant for any posts you need to remove from public viewing, but for which you want to keep the content, as described above.
Use the questions mentioned to make the right choice for a particular post.
Do not use it for posts from which you get significant traffic. Thanks for asking.