Unlock The Magic Of Mailchimp Groups And Segments
How awesome are you?
You’ve set up your account and created your signup forms. You are on your way to building an email list you can be proud of.
Now that you know how to set up general signup forms you are ready to start growing your list. But, before you begin there are a few extra tools you can add to your signup forms to help keep your readers happy and your list organized and healthy.
Mailchimp groups and segments are two important methods you can use to give your readers exactly what they want when they want it. Luckily, Mailchimp does the work for you. All you have to do is tell it how you want to organize your list.
I love easy, don’t you?
To fully understand them you can think of groups as the interests and preferences of your audience and segments as filters. We will look at each one in this lesson.
{Updated for 2019}
Let’s begin with Groups.
Groups allow your readers to tell you about their preferences and interests. You can create options to allow them to receive daily emails, weekly, or only about certain topics. You can create groups based on location, hobbies, or even gender. Groups can be external and public, or internal and private.
Groups allow you to target your audience. This can be exceedingly helpful if you are selling products or services or you write about diverse topics.
If you write about a variety of topics on your blog you probably have them divided into categories. To allow subscribers to only receive emails when you write a post from a certain category you can give them an option on your signup form to choose which posts they receive.
When they choose the options they want, Mailchimp automatically puts them into the correct group. It’s like magic.
Groups keep your email list organized and help you maintain a healthy list. If too many people sign up and then unsubscribe because they can’t get the content they want, your list becomes unhealthy and may even be flagged as spam. You don’t want that.
So, let’s learn how to create a group.
Create A Group
Start by logging into Mailchimp. Go to your list. Now click SIGNUP FORMS – GENERAL FORMS. You should now be in the design center of your signup forms.
There are two ways to create a group. The first is to use the fields and manually insert in the type of group you want to create.
If you scroll down to your form you will see a column of fields on the right. These are all options you can add to your signup form.
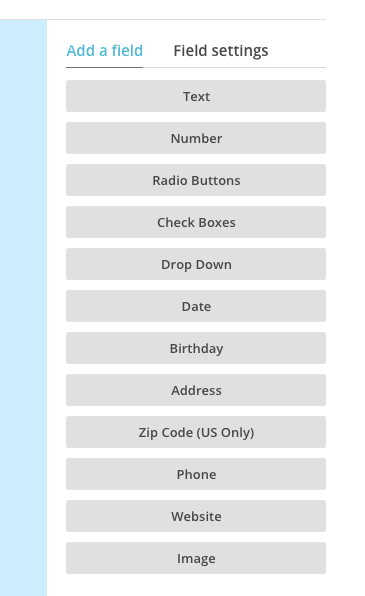
To create a group you have the option of using Radio Buttons, Checkboxes, or Drop Down.
The second, and in my opinion, much easier way to create a group is to go to MANAGE SUBSCRIBERS – GROUPS – CREATE A GROUP.
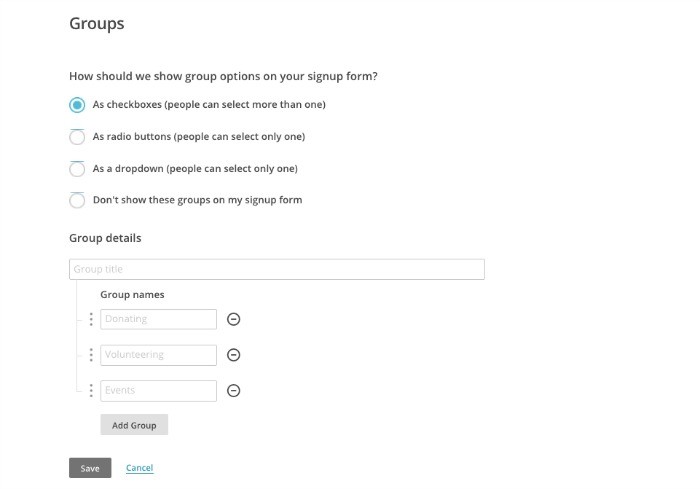
This option will give you all of the options, show you if they allow for one or multiple choices, allow you to name the choices, and automatically save the group for you.
Since you are a beginner, use this method to create your groups.
Now, when you go back to SIGNUP FORMS and scroll down to your form, you will see this section has been added to your form. If you need to make adjustments or add more fields, use the FIELD SETTINGS section on the right.
Click the section on your form, the settings will open on the right, make changes, save.
Feel free to play around with making groups using the different types of buttons and from the two areas – Manage Subscribers and Signup Forms. The more you play, the more you will understand how it all works.
Create A Segment
Segments are filters you can use to learn more about your list members.
To use this feature you must have at least one subscriber. This is a great time to add yourself to your list. You always want to be a subscriber to your own lists so you can see how they look to your subscribers and can catch mistakes.
It’s easy to add yourself in Mailchimp. In your List menu, choose ADD SUBSCRIBER – ADD A SUBSCRIBER. Fill in the fields and save. You are now your first list member!
Segments are created by you, the list owner. You can find this option under MANAGE SUBSCRIBERS – SEGMENTS – CREATE SEGMENT.
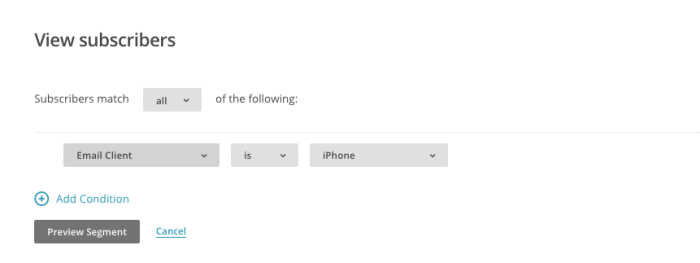
You want to use segments to see how your campaigns are performing, clean up your list, and view the types of subscribers you are attracting. Most likely, you will not use segments often. It is a helpful, but internal tool to help you manage your email list.
You can play around with this section to see how it works and I recommend this KB article to see all the segmenting options you can choose.
Some examples are
- All email addresses that were added before a certain date – to see how you did up to a certain date in attracting subscribers, use this if you change your freebie, for example.
- Any campaign activity did not open all of the last 5 campaigns – to see how well your content is being received. Do you need to tweak what you are writing about? Are people interested?
- Any email client is iPhone – to see how people interact with you.
The possibilities are endless. It is important to know how to manage your list to keep it healthy and your open rate high. By creating segments you can see exactly where the dead weight is and then send them a reminder email or even delete them from the list. A good list cleaning is essential at least one time per year. We will talk about that in a future lesson.
Now you know how to use Mailchimp groups and segments. These tools will help you create a healthy email list.
Using groups and segments allows you to add a little magic to your forms and offer your subscribers your best content in a format that works for them. In turn, they will reward you by opening and clicking on your emails and newsletters.
Happy subscribers equals a healthy list.
If you have any questions, please let me know in the comments.
#YouCanDoThis

[mc4wp_form id=”11788”]


Simply Awesome. Little things like subscribing to my own list would have evaded me. I love this option. It is what I have wanted since I started blogging – a way to allow readers to choose what they view from my diverse site. Yay for you!
Thanks Patty. I’m glad this is a useful series for you. You go girl!
How do groups and segments connect? and after I’ve created groups, I notice that there are email notes in the subscriber list associated to each subscriber, but I can’t sort by those groups. So, how might I best use them? Thank you!
Hi Eleni:
So, groups separate out subscribers by interest. Segments are where those interest groups are stored. When you create a campaign you can choose a group or segment to send to.
As stated above, if you want to only send certain info – which the subscribers has identified as their interest – you can choose that when you create the campaign.
I highly recommend this KB article for further info and clarification: http://kb.mailchimp.com/segments/how-to-use-groups-and-segments
I personally use groups and segments sparingly but they are a wonderful tool to have.
Happy blogging!